1 Overview
The objective of the User Guide is to provide a step by step description of the new system flow with various screen prints. Some Screen Prints in this user guide may change.
Refer to Appendix A – Acronyms when you need an explanation of abbreviations in the user guide.
1.1 KCoVERS Navigation
The user must have access to Internet and the KCoVERS URL and an assigned role that is associated with current responsibilities and KCoVERS transactions.
1.1.1.1 Enterprise
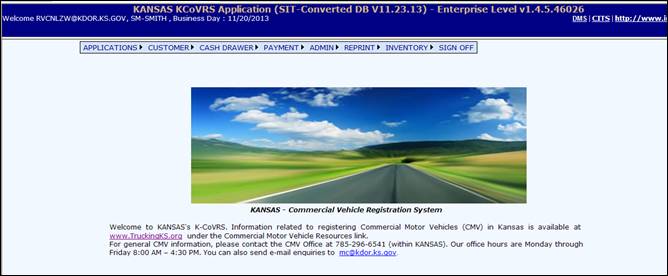
The Enterprise Level screen and menu is the first screen the user will see when they successfully log onto KCoVERS. The menu options displayed will depend on the role the user is assigned in KCoVERS. The “Enterprise” designation is found at the top of the screen.
1.1.1.2 Application Level
From the Enterprise Level of KCoVERS, select one of the applications and the appropriate Application Level screen and associated menu will display.
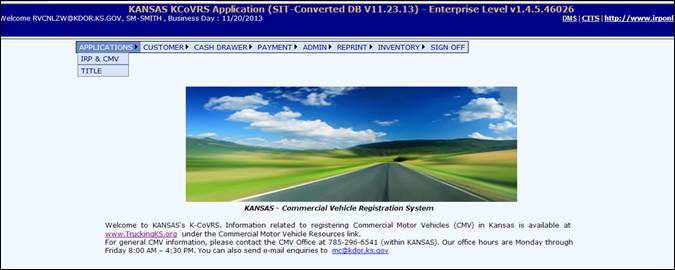
For example, selecting IRP & CMV from the Applications submenu will display the IRP & CMV level screen and menu. The menu items displayed depend on the user role in KCoVERS.

1.1.1.3 Main Menu Bars
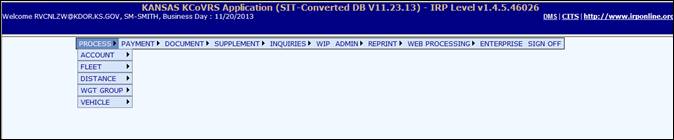
Each KCoVERS application will have its own menu bar which is specific to the application functionality. After the application is selected, the main menu bar will display. The menu options displayed are dependent on the user’s role in KCoVERS.

1.1.1.4 Sub Menus
Some menus in KCoVERS have submenus. If a menu has a submenu, it is designated by the “arrow” at the end of the menu. For example, in the menu below, PROCESS and PAYMENT have a submenu while WIP and ENTERPRISE do not have a submenu.
Additionally, some submenus are further broken down in additional submenus. In the example below, the ADMIN menu has multiple submenus which have additional submenus designated by the “arrow”. The USER and ROLE have submenus and ADMIN FEE does not have a submenu.

1.1.1.5 Search and Selection
Some KCoVERS screens have a search and selection feature. All Inquiry screens have this; however, some transactions such as Work In Progress (WIP) also have this feature. On the Inquiry screens, the user will enter the search criteria and a grid will display with the search results. The information in the grid will differ depending on the object being searched. The user can then select one item from the grid to view additional detail or to select the record for processing.
For example on WIP, the user would enter the Account No. and Click Proceed button to get to the supplement screen directly. If more than one supplement exists for the account, the information grid will display. Based on the information in the grid, the user can select the supplement to process by pressing the SELECT icon located on the left of the supplement line.

1.1.1.6 Transaction Tabs
Once the user is processing a transaction/supplement, the tabs at the top of the screen indicate a transaction progress by colors. These tab color indicators will vary depending on the application and the selected supplement/transaction within the application.
The Tab color indicator schema is as follows: Tab items in grey (Fleet and Distance) indicate screens the user has navigated through. The highlighted tab (Weight) indicates the tab currently being processed. The remaining tabs (i.e. Vehicle, Billing, Payment, etc.) indicate processing yet to happen. The user may navigate back to a previous tab by selecting the desired tab. The MAIN MENU and INQUIRIES tab are there for all transactions.
MAIN MENU returns the user to the MAIN MENU of the application and INQUIRIES displays a pop-up screen. The Inquiry screen may be used at any time and does not interrupt the transaction/supplement being processed.
1.1.1.7 Navigation from Screen to Screen
The navigation from screen to screen in KCoVERS is performed by selecting push buttons at the bottom of the screen. The following five push buttons are common to most screens in KCoVERS and control the navigation:
PROCEED – performs edits on data entered on the screen and if information passes edits, KCoVERS proceeds to the next screen
CANCEL – Cancels the transaction/supplement (Backout transaction)
QUIT – User will exit the transaction; however the transaction is not cancelled. The transaction can be continued using the WIP feature.
REFRESH – Refreshes the screen to look the same way as when the user entered the screen
HELP - Display a pop-up screen with help information to assist the user in entering the correct information on the screen
1.1.1.8 Error Messages
Messages in KCoVERS are displayed at the top of the screen for most transactions. The message has an indicator to designate the message as “I” - information, “W” warning or “E’ error. Errors will normally prevent the transaction from continuing; however information and warnings will allow the transactions to continue.
Information:

Warning:

Error:

1.1.1.9 Verification Screens
In KCoVERS all data entry screens have a verification screen. The verification screen is displayed once all the edits are passed for the screen. Normally the only push buttons on the verification screen are PROCEED and BACK. PROCEED saves the information to the database. BACK allows the user to go back and update the information as required and proceed forward again.
1.2 Enterprise
1.2.1 Customer
1.2.1.1 New Customer
A Customer must be created before an IRP/CMV account can be created. Follow these steps to create a New Customer:
· From the Enterprise Level Menu, select the NEW CUSTOMER from the CUSTOMER tab
· On the New Customer screen, enter the TIN
· To reduce the data entry, if user knows the USDOT & TIN number enter this information and check the CVIEW check box

· Select PROCEED to perform edits on the information entered
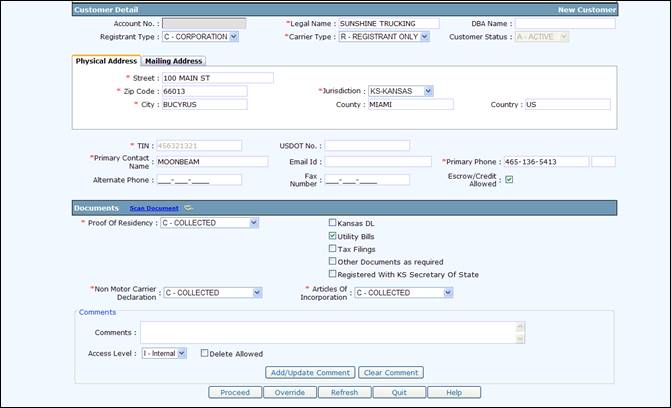
In the Customer Detail screen, the user must enter the information as indicated below:

There are several sections on the Customer Screen: Customer Detail and Documents.
The following information will be prepopulated in case TIN and USDOT combination exists in the CVIEW and CVIEW check box is checked on search screen.
· Legal Name
· DBA Name
· Physical Address – Street, Zip Code, Jurisdiction, City, County, Country
· Mailing Address – Street, Zip Code, Jurisdiction, City, County, Country
· TIN
· USDOT No.
· Primary Contact Name
· Email ID
· Primary Phone
Following information can be entered by the user. Any field preceded with a red asterisk on the screen is required.
· Registrant Type
· Carrier Type
· Alternate Phone
· Fax Number
· Escrow/Credit Allowed
· Documents
o Proof Of Residency – user must identify the type of document(s) provided for verification from the listing on the right
o Non Motor Carrier Declaration
o Articles of Incorporation
· Comments can be added as required
Select PROCEED at the bottom of the screen.
The verification screen will be displayed showing the user a consolidated view of the Customer information. If the user determines some of the information needs to be corrected, they can select BACK and the system will display the Customer screen again. The user can make the required changes and select PROCEED again.
1.2.1.2 Update Customer
Follow these steps to Update Customer:
· From the Enterprise Level Menu, select UPDATE CUSTOMER from the Customer tab
· On the Update Customer screen, enter the Account No
· Select PROCEED to obtain the Customer information
· The most current Customer information will display on the screen and the user can update the information as required
· Select PROCEED to perform the edits and proceed to the validation screen
· Select PROCEED from the validation screen to save the information
1.2.1.3 Customer Inquiry
Follow these steps to do an Inquiry on a Customer:
· From the Enterprise Level Menu, select CUSTOMER INQUIRY from the CUSTOMER tab
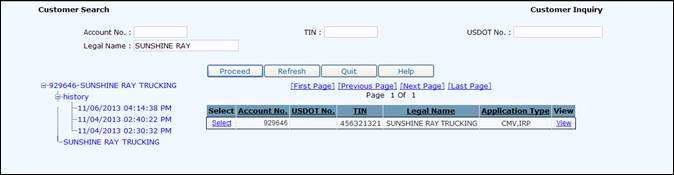
· On the Customer Inquiry screen, enter the Account No, the TIN, the USDOT No., or the Legal Name

· Select PROCEED to display a list of Customers that match the search criteria.
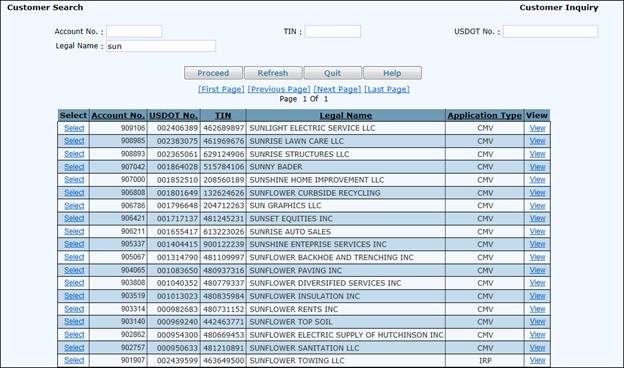
· Select VIEW to the right of the customer to display detailed information about the Customer
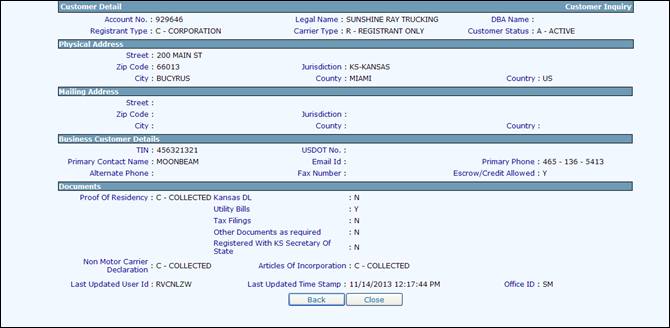
· Select SELECT on the left of the customer result grid to display the Inquiry tree
· Any node on the Inquiry tree can be selected for detail information
· “+” can be expanded
· “-“ can be compressed
· History provides history information on the Customer
· Date and time listed is when the Customer was changed
1.2.1.4 Service Provider
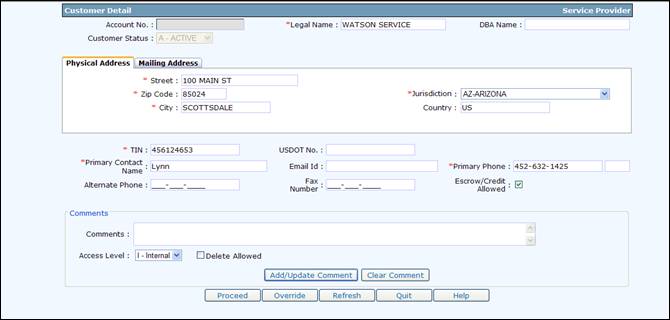
Follow these steps to create a Service Provider:
· From the Enterprise Level Menu, select SERVICE PROVIDER from the Customer tab
· On the New Service Provider screen, enter the following minimum information:
o Legal Name
o Physical Address
o TIN
o Primary Contact Name
o Primary Phone
· Other information can be added if available including:
o DBA Name
o Email ID
o Alternate Phone
o Fax No.
o Escrow/Credit Allowed
o Comments if required
· Select PROCEED to perform the edits and display the validation screen
· Select PROCEED from the validation screen to save the Service Provider information. Service Provider will have a customer id. Once the service provider information is saved to the database, the user can assign the Service Providers to IRP/CMV fleets.
1.2.2 Cash Drawer
The cash drawer functionality groups payments into business days and then creates a deposit based on the business day. Overall flow of cash drawer functionality is as follows:
· Open office using MANAGE OPEN OFFICE from the CASH DRAWER tab OPEN OFFICE submenu. Done once per day by the supervisor/office manager.
· Open Cash Drawer - Each user collecting payments will open a cash drawer for the business day. This is done using OPEN CASH DRAWER from the CASH DRAWER tab
· Close Cash Drawer – Done for each cash drawer that has been opened. Done using CLOSE CASH DRAWER from the CASH DRAWER tab. Refer to Section 1.2.2.5.
· Office Balancing - Use OFFICE BALANCING from the CASH DRAWER tab. This is done once per day per cash drawer by the supervisor/office manager. Refer to Section 1.2.2.9.
· Office Deposit - Use OFFICE DEPOSIT from the CASH DRAWER tab. This is done once per day by the supervisor/office manager. Refer to Section 1.2.2.10.
1.2.2.1 Business day in header
Upon sign on to the application, user will able to see the available business day in the application header and their corresponding office location.
![]()

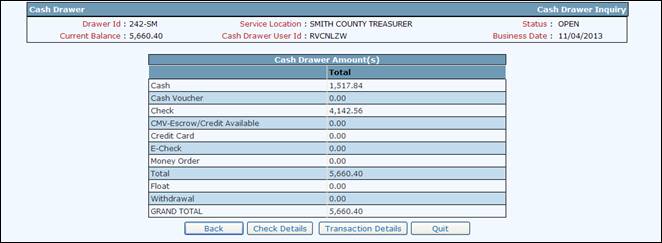
1.2.2.2 Cash Drawer Inquiry
Cash Drawer Inquiry can be used by the user and managers to review the transactions and payment methods for the transactions associated with a specific cash drawer.
To perform a Cash Drawer Inquiry do the following:
· From the Enterprise Level Menu, select CASH DRAWER INQUIRY from the CASH DRAWER tab
· CASH DRAWER USER will default to the user logged on. If the logged on user has privileges, they will be able to select a user from the Cash Drawer User Id drop down.
· Enter BUSINESS DATE BETWEEN dates to narrow the search for the cash drawers
· STATUS can also be selected from the drop down to narrow the search for the cash drawers
· Click on SEARCH to display a list of cash drawers that match the selection criteria
· Select the cash drawer by clicking on the CASH DRAWER Id

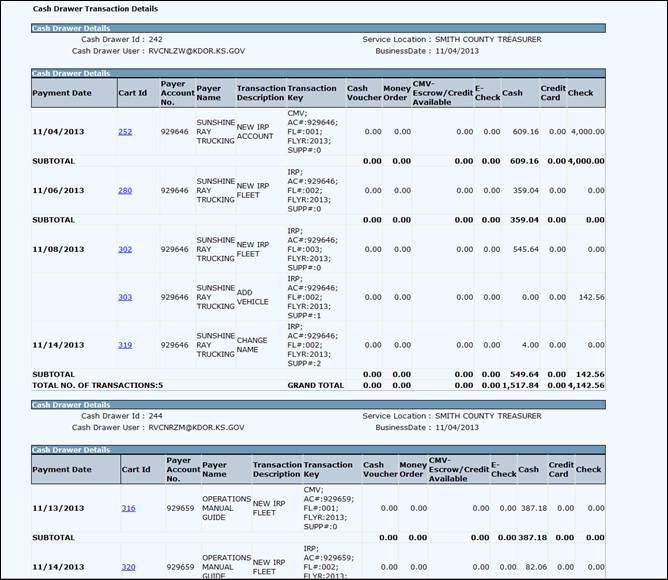
The CASH DRAWER INQUIRY screen will display with cash drawer information at the top and the total.
The user can do the following:
· Select CHECK DETAILS to display a list of the checks and certified funds collected as payment for the transactions associated with the cash drawer
· Select TRANSACTION DETAILS to display a popup of the paid transactions associated with the cash drawer. See TRANSACTION INQUIRY for more detail.
1.2.2.3 Open Office
The Business Day defines the period of time to group transactions into cash drawers and subsequently into a deposit for the office. Normally, the span of a business day is a 24 hour period; however the users can determine the length of the business day as required. The following are some basic rules:
· Only one business day can be open at a time
· A business day can span more than one day (i.e. open on one day and close on the following day)
· A business day must be in open status for a cash drawer to be open for that business day
The business day can have the following status:
· Open – Cash drawers can be opened and payments can be made
· Process – Additional payments cannot be made for that business day; allows for the next business day to be opened
· Closed – Cash drawers have been reconciled and the deposit has been made
1.2.2.3.1 Manage Open Office
Manage Open Office allows the user to do the following:
· If no business day is open, the user can open a business day
· If a business day is open:
o The user can change the status of the open business day to “Process” and,
o Proceed to open the next business day
To Manage Open Office do the following (assumes an existing business day is open):
· From the Enterprise Level Menu, select MANAGE OPEN OFFICE from the CASH DRAWER tab OPEN OFFICE submenu.
· The existing open business day information will populate to the screen. Message indicates to place the business day in PROCESS status. Cash drawer list provides information about the cash drawers associated with the business day.
· User should enter the following:
o END DATE/TIME for the business day if not populated
o Select “Process” status from the drop down
o Select PROCEED to display the validation screen
o Select PROCEED from the validation screen to open the next business day
· Screen for the following day will automatically display. The User can do the following:
o Adjust the BUSINESS DATE as required
o Adjust the START DATE/TIME as required
o Adjust the END DATE/TIME as required
o Select PROCEED to display the validation screen
o Select PROCEED to finish the open process for the next business day

· The User will get a verification message that the next business day has been successfully opened.

1.2.2.3.2 Update Open Office
This is an Admin function used to correct the ‘Status’ of Business Days that have been incorrectly recorded. Previously closed Business Days can be updated to in-process, corrected and then closed with the correct ending balance. User cannot update to “Open”.

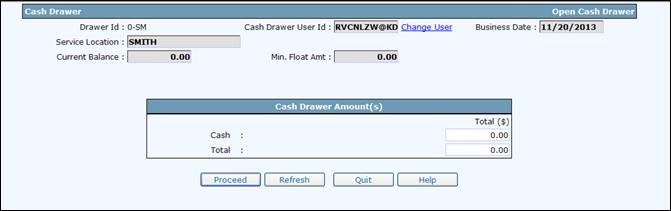
1.2.2.4 Open Cash Drawer
To make a payment, a clerk must have a cash drawer open. The initialize process is used to open the cash drawer. Currently the minimum float amounts are zero.
To initialize cash drawer do the following:
· From the Enterprise Level Menu, select OPEN CASH DRAWER from the CASH DRAWER tab
· The OPEN Cash Drawer screen will display
· If the cash drawer will be opened with monies (float) do the following:
o Count and enter the float amount
· Select PROCEED to execute the edits and display the validation screen
· Select PROCEED to finalize the initialization process
The user can now collect payments.
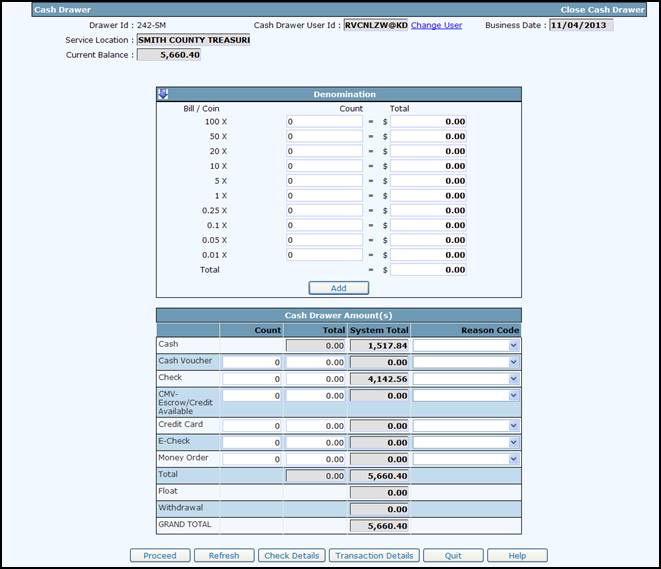
1.2.2.5 Close Cash Drawer
At the end of the business day, the user closes their cash drawer using the close cash drawer process. The user will count their cash and total their other tender types for the business day. This process allows the office manager to reconcile the cash drawer and include the cash drawer monies in the deposit for the business day.
Additionally, the close cash drawer process allows the user to open a cash drawer for the next business day. The user can only have one cash drawer open at a time. All payments processed by the user are associated with the open cash drawer.
To close cash drawer do the following:
· From the Enterprise Level Menu, select CLOSE CASH DRAWER from the CASH DRAWER tab
o The existing cash drawer information will be displayed
o User should count and enter their payment tenders including cash, check, certified, and any credit card payments
· Cash is entered by denomination and then the user presses ADD to add it to the cash drawer amounts
· If the amounts do not match the system totals collected for the payment type, the user can select a reason code from the drop down list
· User can select TRANSACTION DETAILS or CHECK DETAILS to assist in balancing the amounts
o Select PROCEED to execute the edits and display the validation screen
o Select PROCEED from the validation screen to finalize the hold process
· If the user is a supervisor or above, they will have the ability to CHANGE USER
o CHANGE USER will provide a list of the users in the office
· Select one of the users
· The authorized user can then initialize the cash drawer for a particular user as required
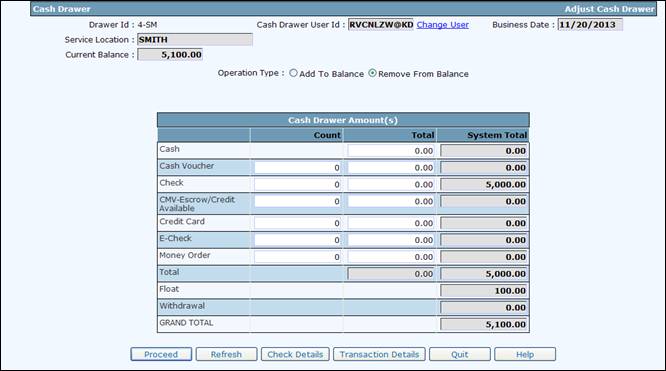
1.2.2.6 Adjust Cash Drawer
The ADJUST Cash Drawer process is to either add additional float balance to the cash drawer (i.e. additional monies to make change) or to remove funds from the cash drawer if the cash drawer has too much money.
To add or remove funds from the cash drawer do the following:
· From the Enterprise Level Menu, select ADJUST CASH DRAWER from the CASH DRAWER tab
· The existing cash drawer information will be displayed
· Select Operation Type to either ADD TO BALANCE or REMOVE FROM BALANCE
o Adjust the cash amount
o All other payment types are only available when REMOVING FROM BALANCE is selected
o Select PROCEED to validate the entry and display the validation screen
o Select PROCEED to finalize the maintenance process
· Other functions available
o Select TRANSACTION DETAILS to view transaction information
o CHANGE USER allows an authorized user to maintain a cash drawer for a user in their office
· Select CHANGE USER and select the user from the pop up
· Proceed as directed above
1.2.2.7 Transaction Inquiry
Transaction Inquiry shows information on the transactions in the user’s cash drawer.
Do the following to view the transaction Inquiry:
· Select TRANSACTION DETAILS from any of the cash drawer screens
o Paid transactions associated with the cash drawer will display
· Selecting the highlighted CART ID for a transaction will display additional detail (see next screen)
· QUIT will close the Transaction Detail screen
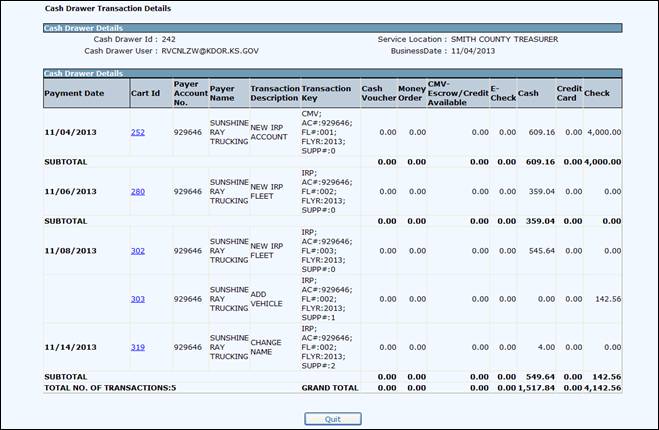
The following detail information is displayed when a Cart ID is selected from the TRANSACTION DETAILS screen.

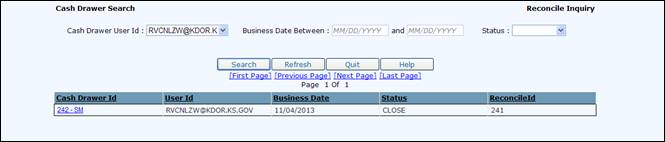
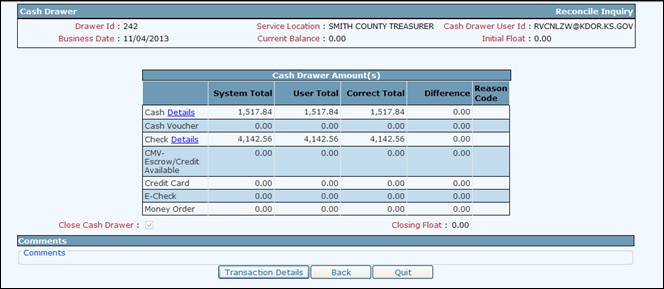
1.2.2.8 Reconcile Inquiry
Reconcile Inquiry provides an Inquiry after a cash drawer has been reconciled.
Do the following to view the cash drawer reconcile inquiry:
· Select RECONCILE INQUIRY from the CASH DRAWER tab in the Enterprise Level Menu
· Select the User ID - If the user is an authorized user they will have the ability to select a User Id
· Enter a date range if required
· Select SEARCH
· A list of cash drawers that match the search criteria will display
· Select a CASH DRAWER ID to display the detail information about the reconciliation
Functions from the detail screen:
· DETAIL Links will provide information about the item(s) it is listed beside
· Select TRANSACTION DETAILS to view transaction information about the paid transaction associated with the cash drawer

1.2.2.9 Office Balancing
Once a cash drawer is closed, the cash drawer can be reconciled. All reconciled cash drawers are included in the deposit.
To reconcile the cash drawer do the following:
· From the Enterprise Level Menu, select OFFICE BALANCING from the CASH DRAWER tab
o A list of all the cash drawers available for reconciliation will display
· Select RECONCILE link on the right side of the cash drawer line to begin the reconciliation process for the cash drawer
· Select QUIT to end reconciling cash drawers and proceed to the deposit

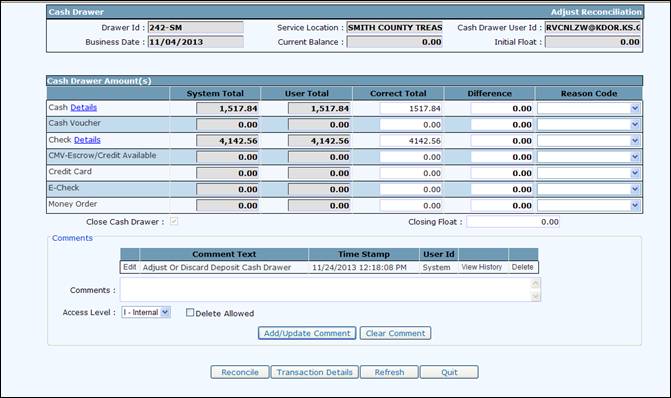
Once the cash drawer is selected, the Cash Drawer Balance screen will display with the cash drawer information.
The user can do the following:
· Modify the amount in the CORRECT TOTAL column as required after the amounts are verified
· Enter the REASON CODE if any amount is changed
o Data Entry
o Incorrect Change
o Mismatch
· User can select DETAILS link to get information on either the cash or check details
· Additionally, click on TRANSACTION DETAILS to see specific information for transactions associated with the cash drawer
· Comments can be added as required
· Click on RECONCILE to perform the edits and display the verification screen
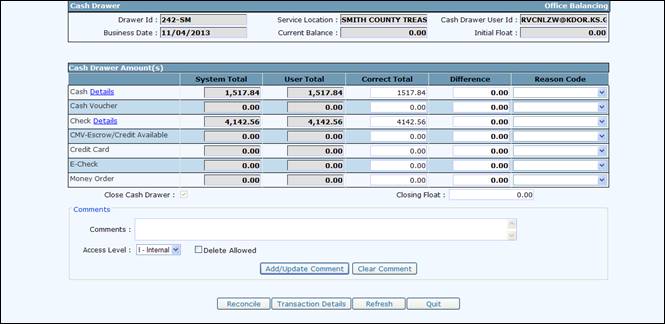
· Click on RECONCILE to finalize the reconcilation process for the specific cash drawer
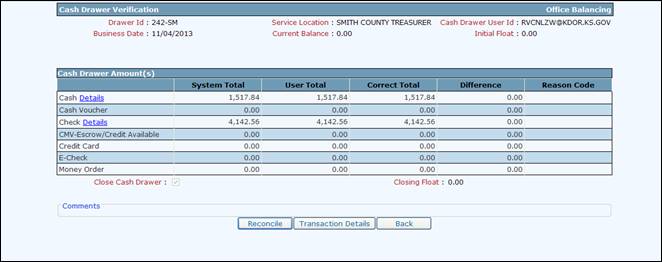
After one cash drawer is reconciled, KCoVRS returns to the list of held cash drawers. The user can do one of the following:
· Select RECONCILE to reconcile another cash drawer
· Click on QUIT to stop reconciling cash drawers
· Need screen shot

1.2.2.10 Office Deposit
The final step for a business day is to create the deposit. All cash drawers must be reconciled for the given business day before the deposit can be created. To create a deposit, do the following:
· From the Enterprise Level Menu, select OFFICE DEPOSIT from the CASH DRAWER tab
o A list of all the business days available for deposit will display
o If only one is available the system will default to the available business day
· Click on PROCEED to display the Cash Drawer Deposit Detail screen
o If you click on CHECK DETAILS, a check list for the deposit will display in a pop-up
o If you click on TRANSACTION DETAILS, a transaction list will display for the transactions associated with the deposit. Refer to Section 1.2.2.7 for transaction detail Inquiry.
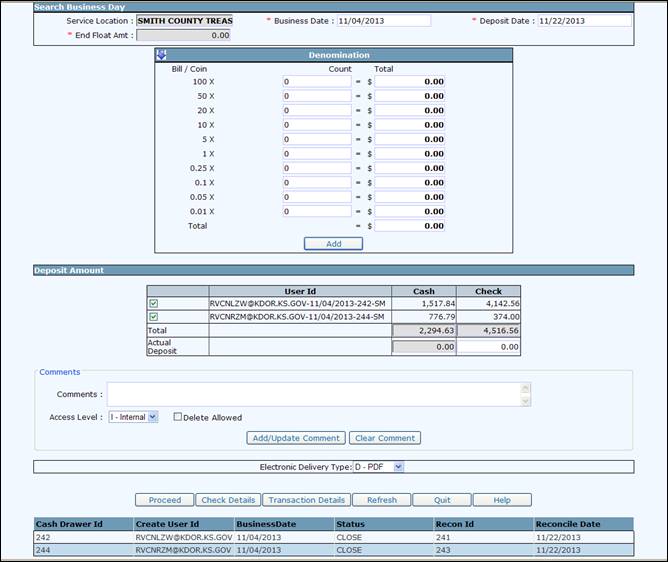
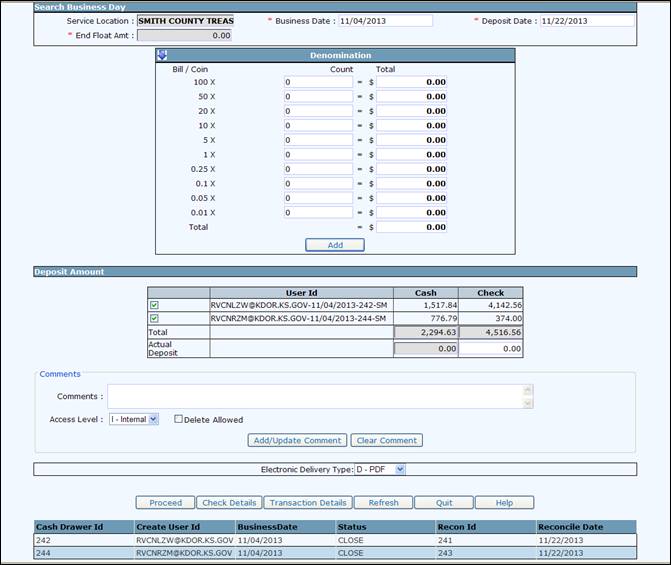
From the transaction detail screen the user should do the following:
· Enter the cash denominations and select ADD to total into the cash total
· Verify the check amount
o CHECK DETAILS and TRANSACTION DETAILS can be displayed for a selected cash drawer
o Select the check box next to the cash drawer and click on either CHECK DETAILS or TRANSACTION DETAILS
o A list of the cash drawers included in the deposit are listed on the screen below the command line (PROCEED, CHECK DETAILS, TRANSACTION DETAILS, REFRESH, QUIT)
· Click on PROCEED to perform the edits and display the validation screen
· Click on PROCEED to finalize the deposit
o Deposit slip and check list will be provided
1.2.2.11 Adjust Reconciliation
The Reconcile Adjustment function allows the user to adjust a reconciled cash drawer after the cash drawer has been reconciled but before it is included in a deposit.
To adjust reconciled cash drawer do the following:
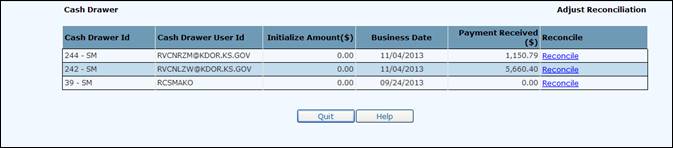
· From the Enterprise Level Menu, select ADJUST RECONCILIATION from the CASH DRAWER tab
o A list of reconciled but not deposited cash drawers will be displayed
· Select RECONCILE to make the adjustment
From the adjust reconciliation screen:
· Follow same process as reconciling a cash drawer
1.2.2.12 Adjust Deposit
The Adjust/Discard Deposit process allows the user to adjust or discard a deposit that has been finalized using the DEPOSIT process. User can only do this on the same day as the deposit date.
1.2.3 Payment
1.2.3.1 Cart Payment
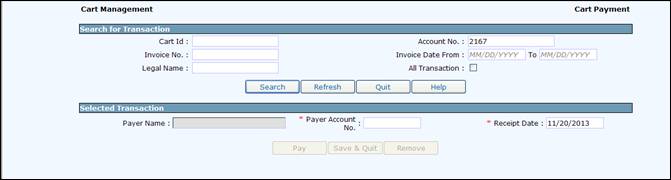
Transactions/supplements are added to a cart for payment. A cart payment can be collected by doing the following:
· From the Enterprise Level Menu, select CART PAYMENT from the PAYMENT tab
· If a cart exists with added transactions, the cart will be listed on the screen
· Otherwise, you can search using the information at the top of the screen
o Cart ID
o Account No
o Invoice No
o Invoice Date From/To
o Legal Name
o Select SEARCH to search for carts matching the criteria
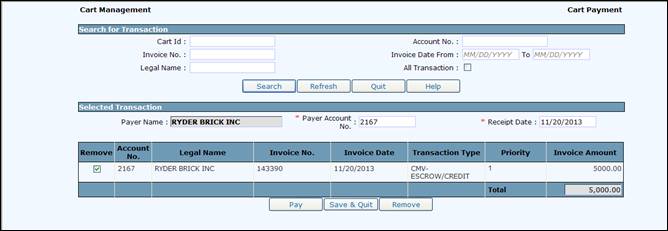
After a cart is selected:
· To remove a transaction from the cart:
o Select the check box next to the transaction
o Click on REMOVE
· To continue to add additional transactions to the cart, click SAVE & QUIT
· Click PAY to perform the edits and display the validation screen
1.2.3.1.1 Payment Collection
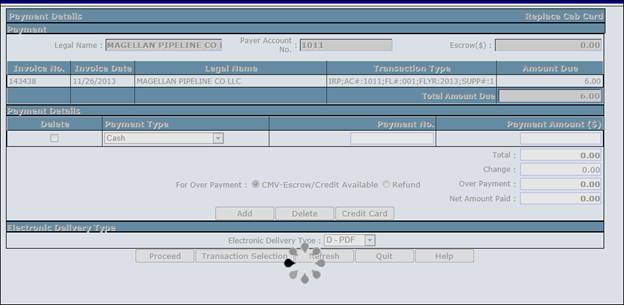
Click PROCEED to proceed to payment from the validation screen. The screen displays the invoices in the cart ready for payment.

On the cart payment screen, you will enter the payment types. To make a payment do the following:
To enter a payment type:
· Select the PAYMENT TYPE from the drop down
· Enter a PAYMENT No., which is required for checks and cash vochers. The number is auto filled for other payment types and not required for Cash payments.
· Enter the PAYMENT AMOUNT
To enter an additional payment type:
· Click ADD - Another line will be added – Follow the direction above to enter a payment type
To delete a payment type:
· Select the DELETE check box next to the payment type line
· Click DELETE – Payment line will be removed
Refund:
· If a refund is due, the user can designate the refund to either go to stored credit or refund
o Select CVM ESCROW/CREDIT for a refund to go to stored credit
o Select REFUND for the refund to be processed as a refund to the carrier
Transaction Selection:
· Click TRANSACTION SELECTION to proceed back to the transaction page to adjust the transactions in the cart
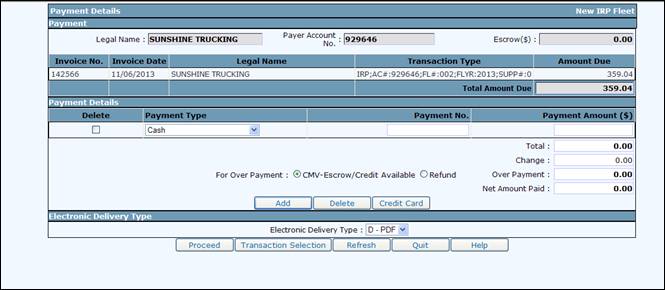
Payment:
· Click on PROCEED to perform the edits and display the validate screen
· Click COMPLETE on the validation screen to finalize the payment and proceed to creation of credentials.
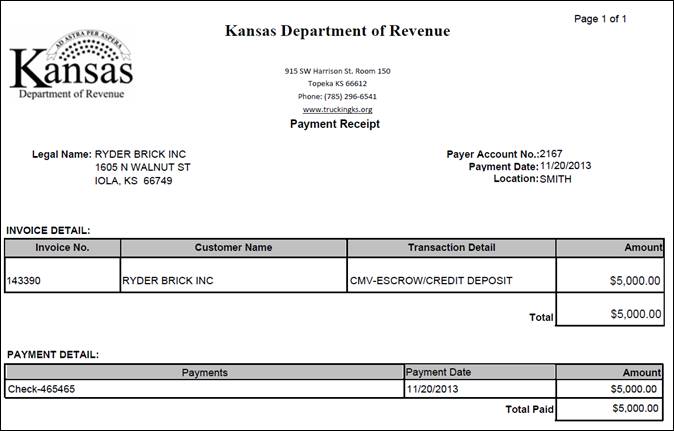
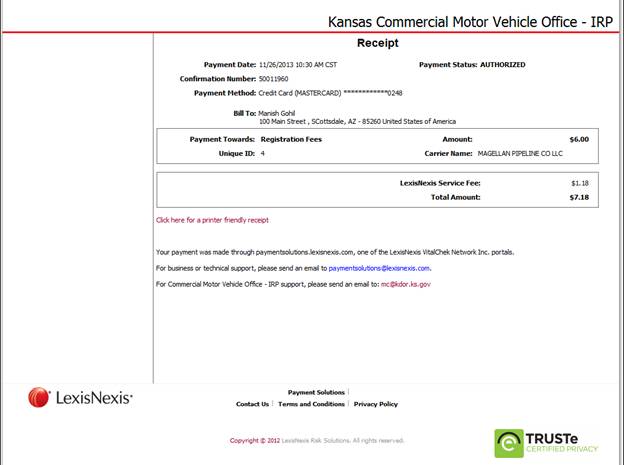
· Payment Receipt will display

Payment receipt will be produced.
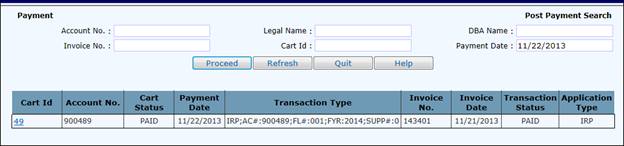
1.2.3.2 Post Payment
The Post Payment menu option can be used to continue with credential assignment if errors occur after payment was collected including inventory.
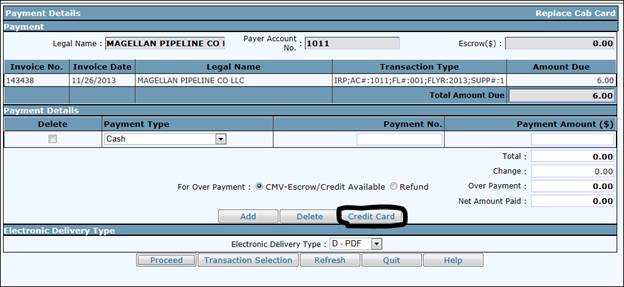
1.2.3.3 Credit Card Payment
In case user wants make a payment using credit care, there is a Credit Card button. User will click on the credit card button and it will open a VitalCheck credit card payment popup window.
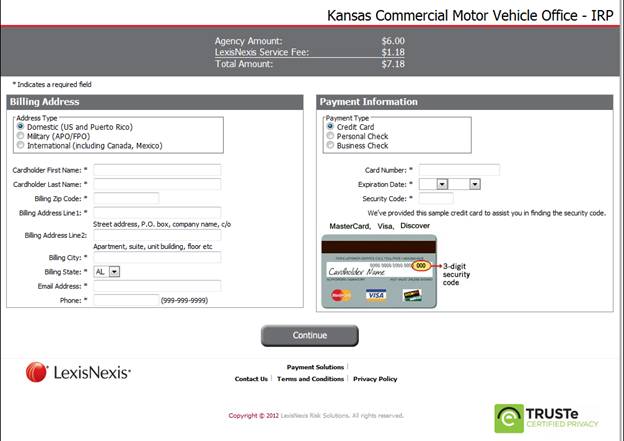
Based on the office location name, this popup window will display the name of the office location in the header of the popup window.
Here user will enter the payment and Billing information and click on “Continue” button to get the Vital check confirmation screen to approve this payment.
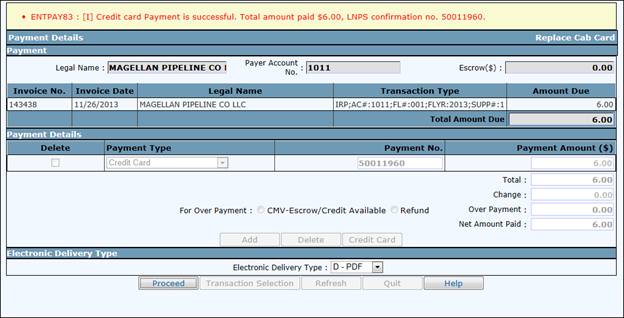
On Confirmation screen, user need to check the Authorization check box and click on the Complete payment button to complete the payment process on Vital Check Site.
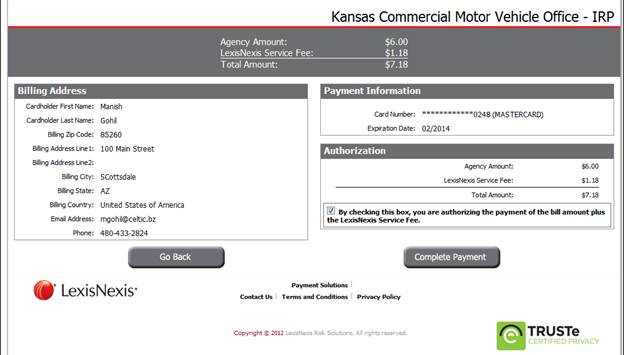
Vital Check will generate the Payment receipt and also send a copy of receipt to email address entered on the first screen. During this time, KCoVRS payment screen will become disabled and it will get the updated information from VitalCheck to update the KCoVRS payment details.
Upon updates to the KCoVRS, system will disable the payment type, payment number and payment amount paid on Vital Check site.
1.2.3.4 Refund
Refund is a two-step process. The refund transaction is written to the refund table during the payment process. Once the refund record is written, the refund can be approved or denied. On a pre-determined basis, all approved refunds are processed and the documentation is provided to Kansas to process the refund checks to the Customers.
1.2.3.4.1 Refund Approval
The refund record is created during the payment process. A refund has one of the following statuses:
· Pending – Not approved or denied
· Approved – Approved for refund
· Denied – Denied for refund
· Manual – will be processed by Kansas using a manual process
To approve or deny a refund do the following:
· From the Enterprise Level Menu, select REFUND APPROVAL from the REFUND sub-menu in the PAYMENT tab
· Select the APPLICATION TYPE from the drop down
· Select the REFUND STATUS – select “Pending”- from the drop down
· Optionally enter an ACCOUNT No., INVOICE No., and/or DATE
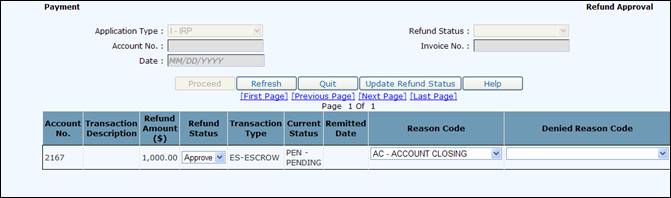
· Select PROCEED to display a list of refunds that match the selection criteria entered

From the list for each refund you want to update:
· Update the REFUND STATUS
· Select the REASON CODE from the drop down
o Reason codes:
o IRP Audit
o Cancel Payment
o Delete Vehicle
o IRP Error Correction
o Over Payment
o Credit Available
o Account Closing

Once you have updated all the refunds you want to change:
· Select UPDATE REFUND STATUS from the command line and the verification screen will display with all the refunds listed you have updated
· Select PROCEED from the verification screen to finalize the process
1.2.3.4.2 Refund Inquiry
Refund Inquiry allows the user to see the status of a refund.
To perform a refund Inquiry do the following:
· From the Enterprise Level Menu, select REFUND INQUIRY from the REFUND sub-menu of the PAYMENT tab
· Enter selection criteria as required - It is recommended to enter at a minimum, the following:
o Account No. or Invoice No., or
o Refund Status, Status From Date and Status To Date
· Select PROCEED once the selection criteria are entered

A list of the refunds matching the criteria will be displayed.
Need screen shot
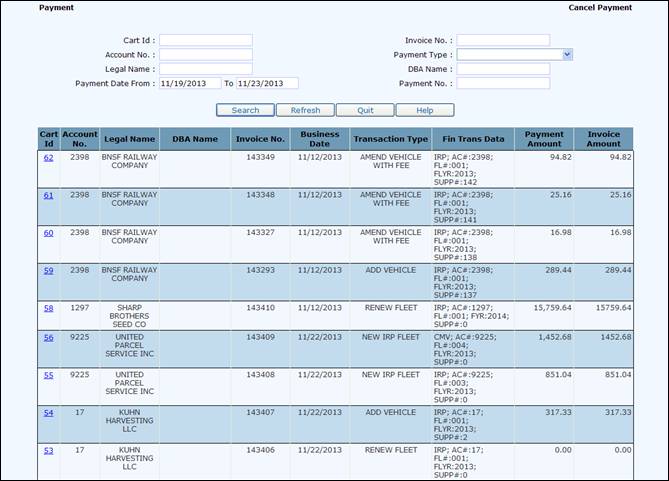
1.2.3.5 Cancel Payment
Same day cancel payment will be done from the Enterprise Level and the entire cart payment will be cancelled. Every transaction in the cart will have the payment cancelled and have an invoiced status.
Previous day cancellations will be done at the application level. Only one transaction/ supplement will be cancelled at the payment amount for the transaction/ supplement will go to Escrow. The Escrow can either be refunded or used on a subsequent payment.
Same Day Cancellation
To cancel payments on the same day do the following:
· From the Enterprise Level Menu, select CANCEL PAYMENT from the PAYMENT tab
· Enter selection criteria to identify the payment to be cancelled
o For the example provided, the Account number was entered
· Select SEARCH to display a list of payments that match the selection criteria entered
· From the list, select the highlighted CART ID and KCOVERS will determine if the payment can be cancelled
o If the payment can be cancelled, the verification screen will display
· Select PROCEED from the verification screen to cancel the payment
1.2.3.6 Escrow/Credit Deposit
To make a deposit to Escrow/Credit do the following:
· From the Enterprise Level Menu, select ESCROW/CREDIT DEPOSIT from the the PAYMENT tab
· Enter the ACCOUNT NO
· Enter the DEPOSIT AMOUNT
· Select PROCEED

· Select PROCEED from the validation screen

· Select PROCEED from the Cart Payment screen after validating the account name and amount

· Make the payment following the procedures in Section XXX.
1.2.3.7 Escrow/Credit Fund Transfer
A Customer can request a fund transfer from their Escrow/Credit accounts. A the refund record is created using this process, the refund will be approved/denied using the REFUND APPROVAL process. If the refund is approved, the refund will then be included in the refund for payment by KDOR.
To process the FUND TRANSFER, do the following:
· From the Enterprise Level Menu, select ESCROW/CREDIT FUND TRANSFER from the PAYMENT tab
· Enter the ACCOUNT No
· Select the ESCROW TYPE from the drop down
· Select PROCEED to display the TRANSFER screen

· Verify the LEGAL NAME of the Customer
o The existing balance is provided
· Enter the amount to be refunded in AMOUNT
· Select PROCEED to execute the edits and display the verification screen
· Select PROCEED from the verification screen to create the refund record

o A Confirmation message is provided

Next step is the REFUND APPROVAL. Please refer to the REFUND APPROVAL process (Section: 1.2.3.3.1) for instructions.
1.2.3.8 Escrow/Credit Inquiry
Inquiry on Escrow shows information on the current balance and the history of the accounts. First identify the Customer/carrier and then you can view the account information.
To perform an Inquiry, do the following:
· From the Enterprise Level Menu, select ESCROW INQUIRY from the PAYMENT tab
· Enter information to provide the account list
· Select PROCEED to display a list of accounts that match the selection criteria
· Select the “Select” link to the left of the ACCOUNT No in the list to display the tree
· Expand the tree by clicking on the “+” sign
· Click on ESCROW/CREDIT AVAILABLE to see the current balance of the account
· Click on the HISTORY link under ESCROW/CREDIT AVAILABLE to see the history – You may need to click on the “+” sign to view the HISTORY link
· Need screen shot
· Click on ESCROW to see the current balance of the account
Current Balance:
Need screen shot

History:
1.2.4 Administrative
1.2.4.1 User
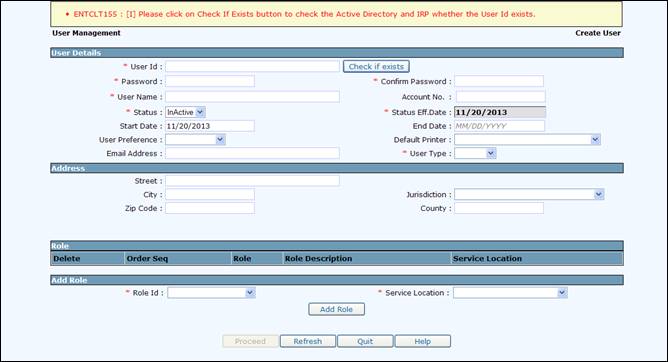
1.2.4.1.1 Create User
To Create a new User, do the following:
· From the Enterprise Level Menu, select CREATE USER from the USER sub-menu in the ADMIN tab
· Once the USER ID has been entered, click CHECK IF EXISTS to see if it is available
o If the PASSWORD and CONFIRM PASSWORD are protected, the user already exists in active directory; however doesn’t exist in the KCoVRS application
o PROCEED will not be enabled until CHECK IF EXISTS is selected
· To ADD a role
o Pick the ROLE ID from the drop-down menu
o Select the SERVICE LOCATION from the drop-down menu
o Select ADD ROLE
o For External Users who are service providers
· Enter the Service Provider account number/customer ID in the ACCOUNT No
· Select Service Provider for the ROLE
· Select Web Office for the SERVICE LOCATION
o For External Users who are carriers
· Enter the carrier account number/customer ID in the ACCOUNT No
· Select External for the ROLE
· Select Web Office for the SERVICE LOCATION
· Click PROCEED to continue to verification screen
· Click PROCEED again to confirm entries and create the new user
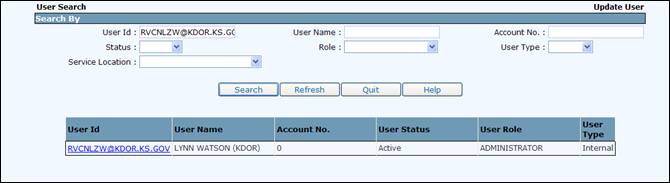
1.2.4.1.2 Update User
The UPDATE USER search screen can be used to select a user for update. Additionally, it can be used to obtain lists of users depending on the criteria entered. Search criteria includes the following:
· User ID
· User Name
· Account number (external users)
· Status
· Role
· User Type
· Service Location
To Update a User, do the following:
· From the Enterprise Level Menu, select UPDATE USER from the USER sub-menu in the ADMIN tab
· Enter the USER ID and click SEARCH
· Click on the USER ID to update user information, as in the previous section (1.2.4.1.1)
1.2.4.1.3 Reset Password
Reset password is used by system administrators to reset another user’s password to a temporary password. To reset a password, do the following:
· From the Enterprise Level Menu, select RESET PASSWORD from the USER sub-menu in the ADMIN tab
· Enter the USER ID, the password and confirmation
· Press PROCEED to reset the password
· This functionality will be available only for USER ID’s which does not include @ks.gov

1.2.4.1.4 Change Password
Users can use CHANGE PASSWORD to change their own password. To Change a Password, do the following:
· From the Enterprise Level Menu, select CHANGE PASSWORD from the USER sub-menu in the ADMIN tab
· Enter the USER ID, the current (old) password, the new password and confirmation
· SECRET QUESTION AND SECRET ANSWER are auto-populated from previous information and can also be changed at this time
· Press PROCEED to change the password
· This functionality will be available only for USER ID’s which does not include @ks.gov

1.2.4.2 Role
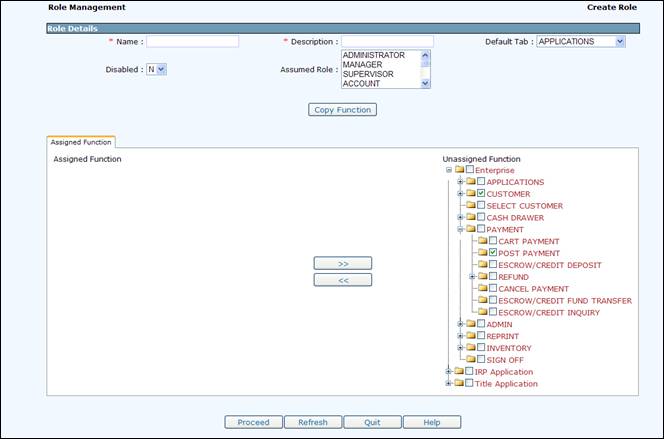
1.2.4.2.1 Create Role
To Create a Role, do the following:
· From the Enterprise Level Menu, select CREATE ROLE from the ROLE sub-menu in the ADMIN tab
· Enter the Role Name and Description
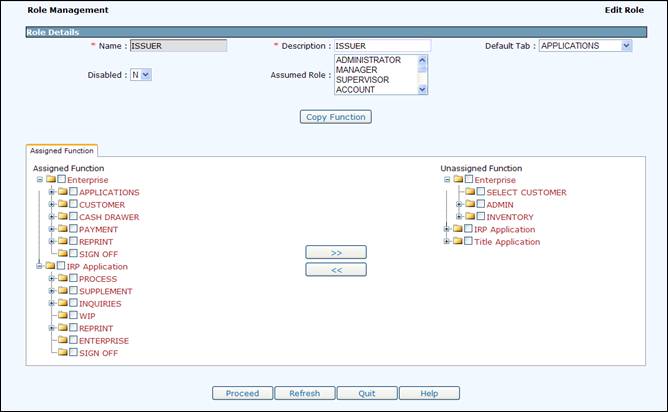
· Pick the closest existing role from the ASSUMED ROLE drop down menu
· Customize the role by moving the responsibilities from the Unassigned Function list to the Assigned Function list (on the left side)
· Remove functions by moving items from the assigned (left) side to the unassigned (right) side
· Press PROCEED to create the new role
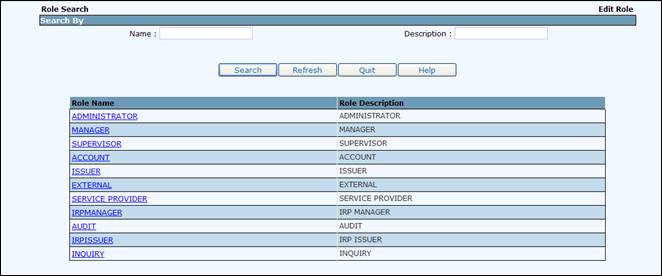
1.2.4.2.2 Edit Role
To Edit a Role, do the following:
· From the Enterprise Level Menu, select EDIT ROLE from the ROLE sub-menu in the ADMIN tab
· Enter the Role Name and click SEARCH
· Click on the Role you would like to edit
· Complete the edits as in section 1.2.4.2.1 (Create Role)
· Press PROCEED when done with the edits to enter the Edited Role in the system
1.2.4.3 Jurisdiction
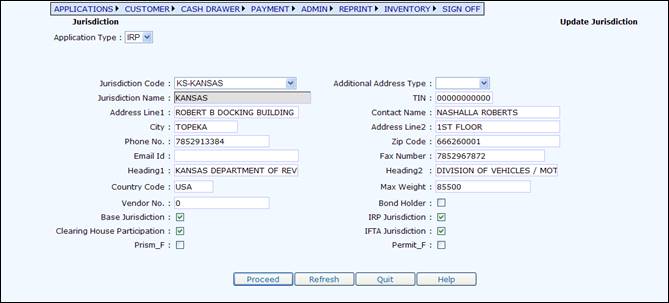
1.2.4.3.1 Update Jurisdiction
The system will provide the facility to maintain each of the jurisdictions’ profiles. IRP information for the jurisdiction includes maximum allowable weight and contact information.
To Update a Jurisdiction, do the following:
· From the Enterprise Level Menu, select UPDATE JURISDICTION from the JURISDICTION sub-menu in the ADMIN tab
· Click the drop down menu from the JURISDICTION CODE to choose the jurisdiction to edit
o The system will automatically populate the fields with the current information
· Make the changes to the appropriate fields and select PROCEED to move to the verification page
· Press PROCEED again to accept the changes

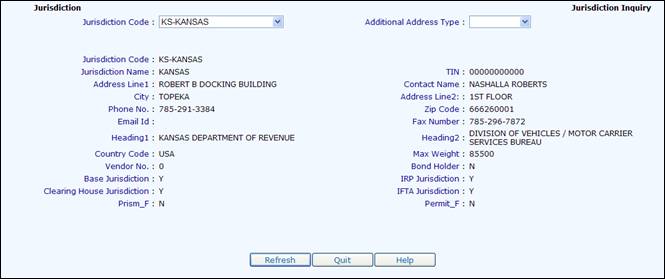
1.2.4.3.2 Jurisdiction Inquiry
To do a Jurisdiction Inquiry, do the following:
· From the Enterprise Level Menu, select JURISDICTION INQUIRY from the JURISDICTION sub-menu in the ADMIN tab
· Pick the JURISDICTION from the drop-down menu to view details
1.2.4.4 Location
Only System administrator will have ability to add or update Location information.
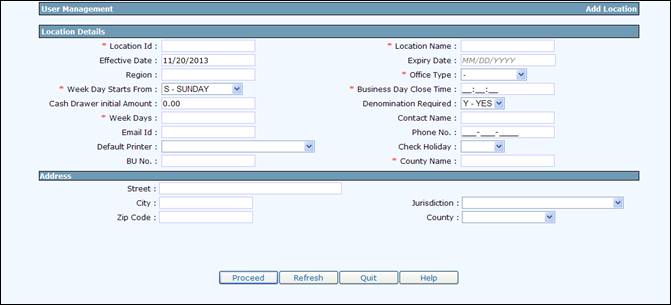
1.2.4.4.1 Add Location
To add a new location, do the following:
· From the Enterprise Level Menu, select ADD LOCATION from the LOCATION sub-menu in the ADMIN tab
· Enter the fields as required. Fields with red asterisk (*) are mandatory
o Location ID - Code for the location ID – 2 characters
o Location Name – Name will display in the drop-down for service location along with the Location ID
o Region – for Region roll up
o Office Type – IRP, CMV, Both or Disabled
o Week Day Starts From – used in conjunction with WEEK DAYS
o Business Close Time – default value on the Open Office screens for the Close Time of the Business Day
o Cash Drawer Initial Amount – Minimum amount of float for all users in the location
o Denomination Required – determine if the users must enter denominations for cash drawer functionality
o Week Days – String of Y/N indicators specifying the days of the week the location will be open. Beginning day of the week is the value in Week Day Starts From
o Check Holiday – indicates if holidays should be bypassed when defaulting the next business day
o County Name – name of the county the office is located in
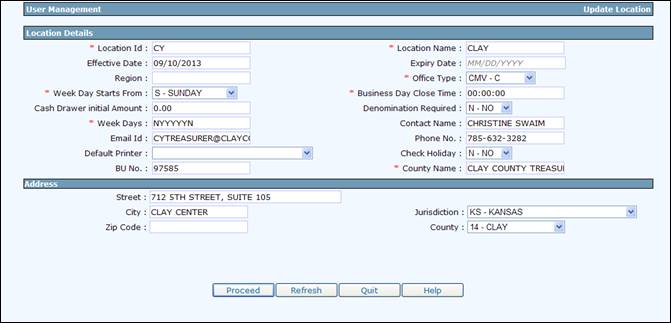
1.2.4.4.2 Update Location
To add update a location, do the following:
· From the Enterprise Level Menu, select UPDATE LOCATION from the LOCATION sub-menu in the ADMIN tab
· Enter either a LOCATION ID or OFFICE TYPE
· Select SEARCH to display a list of locations that match the criteria
· Select the LOCATION ID from the grid.

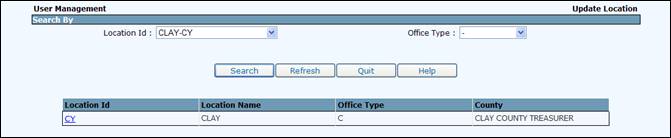
· Proceed with updates. Fields are defined in the previous section.
1.2.4.5 Admin Fee
To enter an Administration Fee, do the following:
· From the Enterprise Level Menu, select ADMIN FEE from the ADMIN tab
· Select ADMIN FEE TYPE from drop-down menu
· Enter the Fee Amount, the Service Effective Date and the Service Expiration Date
· Press ADD to confirm the Admin Fee

To update an Administration Fee, do the following:
· From the Enterprise Level Menu, select ADMIN FEE from the ADMIN tab
· Select either EDIT or DELETE from the link next to the Administrative Fee
· Enter the new Fee Amount and Effective Date

Exchange Rate:
The Admin Fee page provides an Exchange Rate function that is updated with the current exchange rates the IRP fee calculations.
To enter an Administration Fee, do the following:
· From the Enterprise Level Menu, select ADMIN FEE from the ADMIN tab
· Select EXCHANGE RATE from drop-down menu
· Enter the COUNTRY CODE (AA), the EXCHANGE RATE for the US and the Service Expiration Date (must be in the future)

1.2.4.6 Admin Report
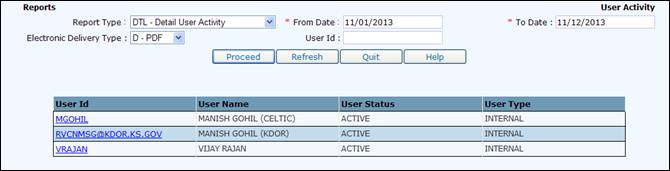
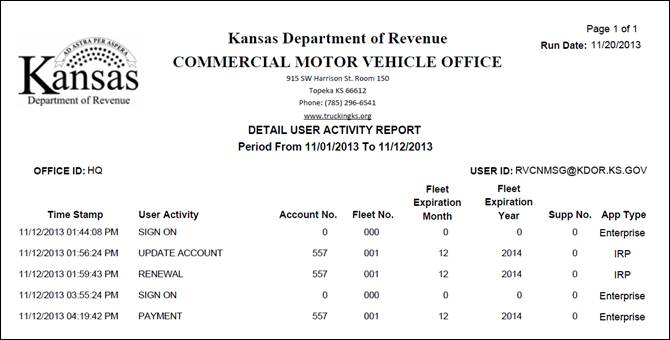
1.2.4.6.1 User Activity
To view the User Activity, do the following:
· From the Enterprise Level Menu, select USER ACTIVITY from the ADMIN REPORT sub-menu in the ADMIN tab
· From the Report Type drop down menu, select desired report type. Some parameters may change based on the Report Type selected.
· Pick the type of document to produce for Electronic Delivery, either PDF or Email
· Enter the ‘From’ and ‘To’ dates, and the USER ID
· Enter any other required fields
· Select PROCEED to generate the report

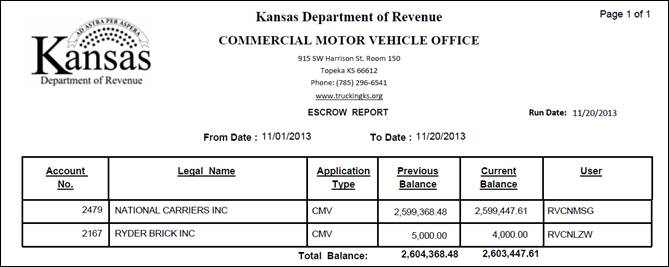
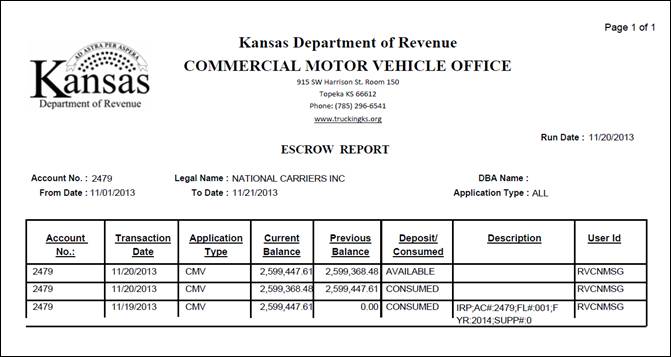
1.2.4.6.2 Escrow/Credit
To view the Escrow Activity, do the following:
· From the Enterprise Level Menu, select ESCROW/CREDIT from the ADMIN REPORT sub-menu in the ADMIN tab
· From the Report Type drop down menu, pick the type of report to generate
· Pick the type of document to produce for Electronic Delivery, either PDF or Email
· Enter the ‘From’ and ‘To’ dates, and the Account Number (for the detail report)
· Press PROCEED to generate list of customers who have Escrow activity

Summary Escrow Report:
Detailed Escrow Report:
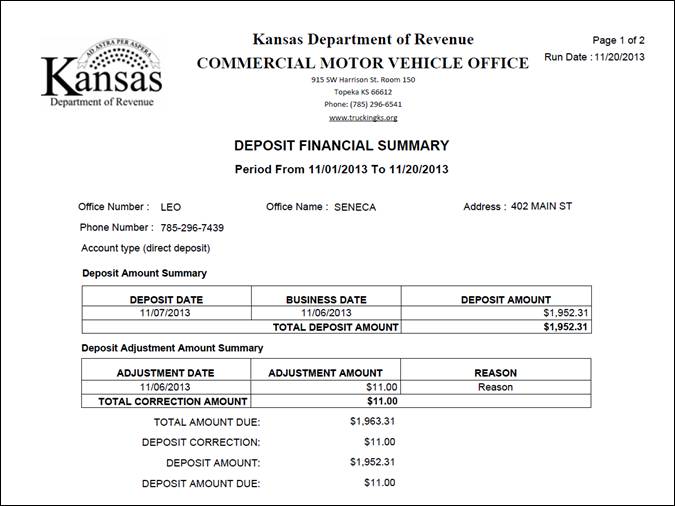
1.2.4.6.3 Deposit FinancialSummary
To view the Deposit Summary report, do the following:
· From the Enterprise Level Menu, select from the ADMIN REPORT sub-menu in the ADMIN tab
· From the Enterprise Level Menu, select DEPOSIT FINANCIAL SUMMARY from the ADMIN REPORT sub-menu in the ADMIN tab
· Enter the ‘From’ and ‘To’ dates, the REPORT BY and the SERVICE LOCATION. COUNTY can be selected depending on the REPORT BY selection.
· Pick the type of document to produce for Electronic Delivery, either PDF or Email
· Press PROCEED to generate the report.

1.2.4.7 Ad Hoc
To access the Ad Hoc menu, do the following:
· From the Enterprise Level Menu, select AD HOC from the ADMIN tab
· Do one of the following:
o Enter new SQL
o Select a saved query from the SELECT QUERY drop down
o Select PROCEED to execute the SQL and produce a result list

To Save the query:
· Select either “SAVE” or “Save AS” and provide a name
To Export the result list:
· Select “Export to EXCEL” and provide a file name
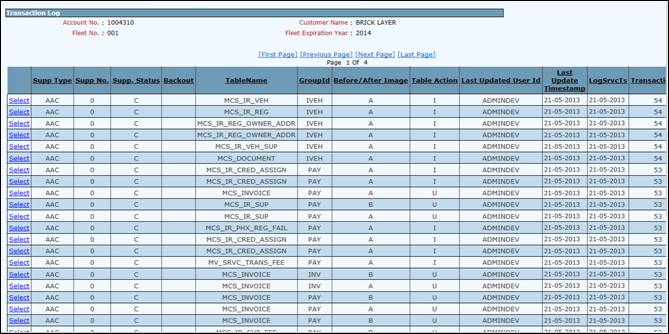
1.2.4.8 Transaction
To access the Transaction Log Inquiry, do the following:
· From the Enterprise Level Menu, select TRANSLOG INQUIRY from the Transaction sub-menu in the ADMIN tab
· Enter the search parameters as required:
o Account No., Fleet No., and Fleet Expiration Year, at a minimum, are required
· Select PROCEED to display the results
1.2.4.9 Batch Process
Users in Administrator roles will have access to this menu item.
1.2.4.9.1 Cart Cleanup
Cart Cleanup removes all unpaid transactions from a cart for the provided date. The process is a scheduled batch process.
To execute the process manually:
· From the Enterprise Level Menu, select BATCH PROCESS from the ADMIN tab
· Select the CART CLEANUP batch process
· Enter the RUN DATE
· Select the OFFICE ID from the drop down
· Select PROCEED to submit the batch job
· A report is created indicating which transactions have been removed from the cart

1.2.4.9.2 Refund
The refund batch process creates the refund notice for all approved refunds. This process can be executed in either a report mode (no update) or update mode. Report mode creates a report of all refunds scheduled to have the refund notice created and does not create the refund notice. Update mode creates the report and the refund notice. The process will be scheduled in the update mode.
To execute the process manually:
· From the Enterprise Level Menu, select BATCH PROCESS from the ADMIN tab
· Select the REFUND batch process
· Enter the RUN DATE
· Select the OPERATION from the drop down
o Report will only produce a report for the carriers to be refunded and not update the refund record as being “PAID”
o Update will update the records as “PAID” providing letters and a report for the records processed
· Pick the type of document to produce for Electronic Delivery, either PDF or Print
· Select PROCEED to submit the batch job

1.2.4.9.3 Internet Cash Drawer
KCoVRS system has one cash drawer per day for the External users. This job will be scheduled in production. The batch job will place the previous day cash drawer on “HOLD” and initialize a cash drawer for the next day.
EXECUTION MODE includes the following:
· Initialize Cash Drawer – initialize the cash drawer for the Business Day
· Hold Cash Drawer – place the cash drawer on hold for the Business Day
· Reconcile Cash Drawer – reconcile the cash drawer for the Business Day
· Deposit Cash Drawer – Deposits External Cash Drawer
· All – Holds the open cash drawer, reconciles the cash drawer, and initializes for the next day

1.2.4.10 Email Management
1.2.4.10.1 Edit Email Template
To update an existing template do the following:
· From the Enterprise Level Menu, select EDIT EMAIL TEMPLATE from the EMAIL MANAGEMENT sub-menu in the ADMIN tab
· Select the APPLICATION from the drop down
· Select PROCEED

· Select the “Select” link for the template from the list and it will populate in the update screen
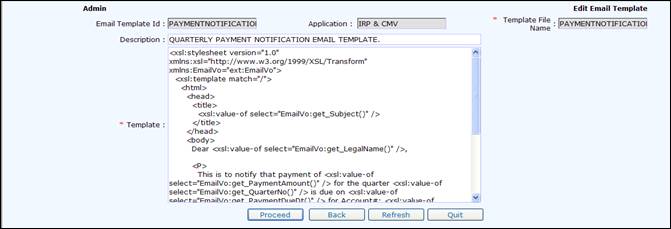
· Update the template as required
· Select PROCEED to save the updates
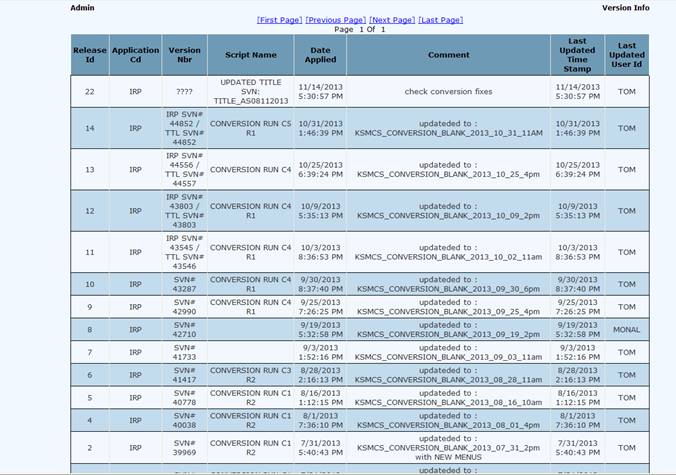
1.2.4.11 Version Information
1.2.4.12 Verify Prerequisites
This function verifies the client prerequisites of the system.

1.2.5 Payment Receipt Reprint

1.2.6 Manage Inventory
1.2.6.1 New Inventory
An authorized user can enter the inventory into the system. Additionally, the user can assign it to a specific user if required.
To enter inventory into the system, do the following:
· From the Enterprise Level Menu, select NEW INVENTORY from the INVENTORY tab
· Select the APPLICATION TYPE from the drop down
· Select the INVENTORY TYPE from the drop down
· INVENTORY STATUS is set to In-Stock
· Enter the FROM NO and the TO NO
· STATUS EFFECTIVE DATE will auto-populate with the current date
· Select the ISSUE LOCATION from the drop down
· Select PROCEED to perform the edits and display the validation screen
· Select PROCEED from the validation screen to assign the inventory
· At a time user can add 10000 inventory togather.

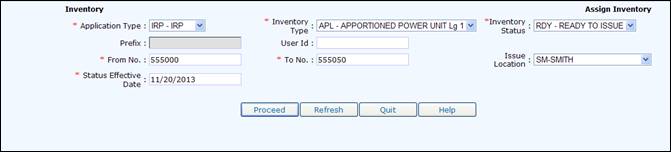
1.2.6.2 Assign Inventory
Assign inventory is used to update the inventory to Ready to Issue and if required assign the inventory to a specific user.
To assign inventory, do the following:
· From the Enterprise Level Menu, select ASSIGN INVENTORY from the INVENTORY tab
· Select the APPLICATION TYPE from the drop down
· Select the INVENTORY TYPE from the drop down
· Select the INVENTORY STATUS from the drop down. READY TO ISSUE status will make the inventory available to issue
· Enter the FROM NO and the TO NO
· Enter the USER ID the inventory is being assigned to
· If required, select the ISSUE LOCATION from the drop down
· STATUS EFFECTIVE DATE will auto-populate with the current date
· Select PROCEED to perform the edits and display the validation screen
· Select PROCEED from the validation screen to assign the inventory
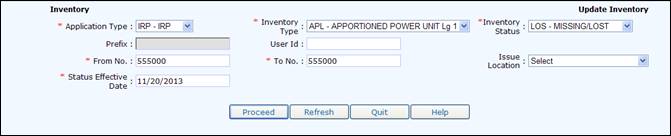
1.2.6.3 Update Inventory
Update inventory is used to update the inventory status. To update the inventory status, do the following:
· From the Enterprise Level Menu, select UPDATE INVENTORY from the INVENTORY tab
· Select the APPLICATION TYPE from the drop down
· Select the INVENTORY TYPE from the drop down
· Select the INVENTORY STATUS from the drop down
o Deleted
o Missing/Lost
o Ready to Issue
· Enter the FROM NO and the TO NO
· If required, select the ISSUE LOCATION from the drop down
· STATUS EFFECTIVE DATE will auto-populate with the current date
· Select PROCEED to perform the edits and display the validation screen
· Select PROCEED from the validation screen to assign the inventory
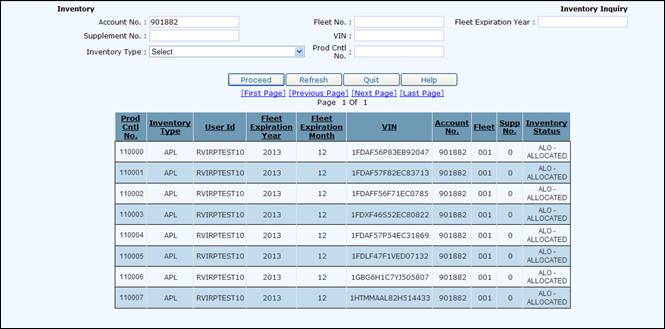
1.2.6.4 Inventory Inquiry
Inventory inquiry is used to determine what inventory is assigned to a particular vehicle.
To perform an inventory inquiry, do the following:
· From the Enterprise Level Menu, select INVENTORY INQUIRY from the INVENTORY tab
· Provide one of the following criteria:
o Account No
o Fleet No
o Fleet Expiration Year
o Supplement No
o VIN
o Inventory Type
o Prod Cntl No – this is the inventory number (i.e. the plate number)

· Select PROCEED to display the results
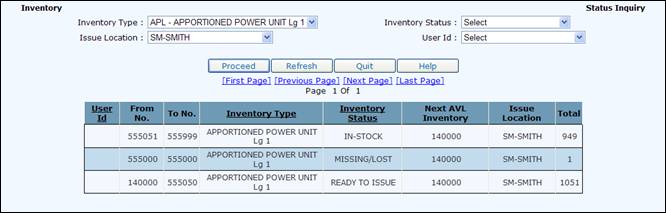
1.2.6.5 Status Inquiry
Status inquiry provides a picture of inventory assigned to specific users.
To perform a status inquiry, do the following:
· From the Enterprise Level Menu, select STATUS INQUIRY from the INVENTORY tab
· Select one of the following criteria from the drop down:
o Inventory Type
o Inventory Status
o Issue Location
o User ID

· Select PROCEED to display the results
o READY TO ISSUE status will display the “Next Available Inventory” number for the INVENTORY TYPE
1.2.6.6 Inventory Report
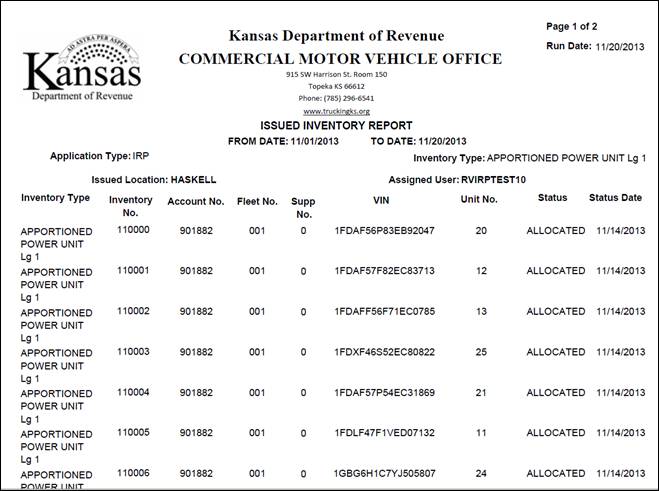
1.2.6.6.1 Issued Inventory
The Issued Inventory report gives information on issued/allocated inventory as well as other status including Damaged, Missing etc. The authorized user can provide the following search parameters for the report. At a minimum either an INVENTORY TYPE or a date range is required.
· INVENTORY TYPE
· Range of Dates – FROM DATE and TO DATE
· INVENTORY STATUS
o Allocated/issued
o Damaged
o Deleted
o Lost/Stolen
o Missing
o All – report will include all statuses listed above
· USER ID – user who issued/updated the inventory
· ELECTRONIC DELIVERY TYPE
o PDF

· Select PROCEED to create the report
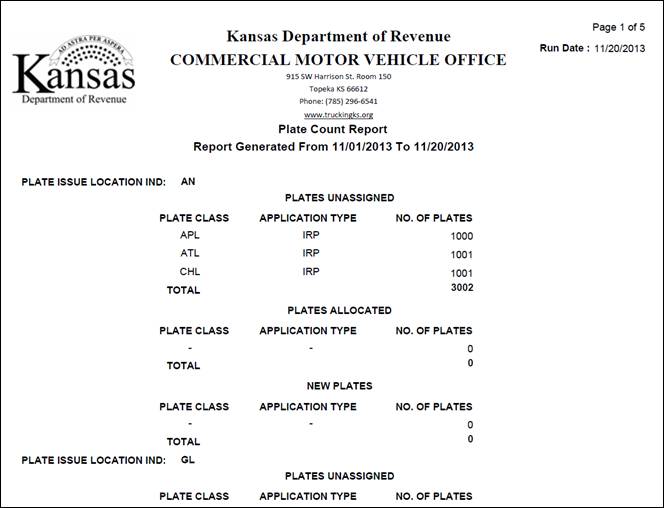
1.2.6.6.2 Remaining Inventory
The Remaining Inventory report gives information remaining inventor. The authorized user can provide the following search parameters for the report. At a minimum either an INVENTORY TYPE or a date range is required.
· APPLICATION TYPE
· Range of Dates – FROM DATE and TO DATE
· ELECTRONIC DELIVERY TYPE
o PDF

· Select PROCEED to create the report
1.2.7 Sign Off
Sign Off will close current session of user and re-direct to Sign On page.
Appendix A – Acronyms
|
URL |
Uniform Resource Locator |
|
IRP |
International Registration Plan |
|
WIP |
Work In Progress |
|
ADMIN |
Administrator |
|
TIN |
Taxpayer Identification Number |
|
USDOT |
United States Department of Transportation |
|
|
Portable Document Format |
|
CMV |
Commercial Motor Vehicle |
|
|
|
|
|
|